微分方程式いろいろサーバ移転ログ3
MariaDBの起動
systemctl enable mariadb
systemctl start mariadb
[root@ik1-123-45679 etc]# systemctl enable mariadb
Created symlink /etc/systemd/system/mysql.service → /usr/lib/systemd/system/mariadb.service.
Created symlink /etc/systemd/system/mysqld.service → /usr/lib/systemd/system/mariadb.service.
Created symlink /etc/systemd/system/multi-user.target.wants/mariadb.service → /usr/lib/systemd/system/mariadb.service.
[root@ik1-123-45679 etc]# systemctl start mariadb
[root@ik1-123-45679 etc]#
MariaDBのパスワード設定
途中以下で聞かれるがEnter押下で先へ進む。
[root@ik1-123-45679 etc]# mysql_secure_installation

NOTE: RUNNING ALL PARTS OF THIS SCRIPT IS RECOMMENDED FOR ALL MariaDB
      SERVERS IN PRODUCTION USE!  PLEASE READ EACH STEP CAREFULLY!

In order to log into MariaDB to secure it, we'll need the current
password for the root user. If you've just installed MariaDB, and
haven't set the root password yet, you should just press enter here.

Enter current password for root (enter for none):
”y”でEnter
OK, successfully used password, moving on...

Setting the root password or using the unix_socket ensures that nobody
can log into the MariaDB root user without the proper authorisation.

You already have your root account protected, so you can safely answer 'n'.

Switch to unix_socket authentication [Y/n]
“y”でEnterでパスワードの設定をする。
Change the root password? [Y/n] y
New password:
Re-enter new password:
Password updated successfully!
Reloading privilege tables..
 ... Success!
“y”でEnter.
By default, a MariaDB installation has an anonymous user, allowing anyone
to log into MariaDB without having to have a user account created for
them.  This is intended only for testing, and to make the installation
go a bit smoother.  You should remove them before moving into a
production environment.

Remove anonymous users? [Y/n]
“y”でEnter
Normally, root should only be allowed to connect from 'localhost'.  This
ensures that someone cannot guess at the root password from the network.

Disallow root login remotely? [Y/n]
YでEnter
By default, MariaDB comes with a database named 'test' that anyone can
access.  This is also intended only for testing, and should be removed
before moving into a production environment.

Remove test database and access to it? [Y/n]
“y”でEnter
Reloading the privilege tables will ensure that all changes made so far
will take effect immediately.

Reload privilege tables now? [Y/n]
以下のように表示されれば完了になる。
Cleaning up...

All done!  If you've completed all of the above steps, your MariaDB
installation should now be secure.

Thanks for using MariaDB!
[root@ik1-123-45679 etc]#
Maria DBの確認
いったん管理者からログアウトして一般ユーザにて以下のように入力してDBの確認をする。
mysql -u root -p
先ほど設定したMariaDBのパスワードを入力してログインできるかを確認する。
[centos@ik1-123-45679 ~]$ mysql -u root -p
Enter password:
Welcome to the MariaDB monitor.  Commands end with ; or \g.
Your MariaDB connection id is 42
Server version: 10.5.22-MariaDB MariaDB Server

Copyright (c) 2000, 2018, Oracle, MariaDB Corporation Ab and others.

Type 'help;' or '\h' for help. Type '\c' to clear the current input statement.

MariaDB [(none)]>
次のように入力してデータベースを確認する。
MariaDB [(none)]> show databases;
+--------------------+
| Database           |
+--------------------+
| information_schema |
| mysql              |
| performance_schema |
+--------------------+
3 rows in set (0.000 sec)

MariaDB [(none)]>
phpMyAdminのインストール
インストールしたMariaDBを操作するためにphpMyadminのインストールを行う。
cd /var/www/html
wget https://files.phpmyadmin.net/phpMyAdmin/4.9.1/phpMyAdmin-4.9.1-all-languages.zip
上記wgetが聞かない場合はdnf install wgetとしてインストールしてから実施する。
解凍する。
unzip phpMyAdmin-4.9.1-all-languages.zip
mv phpMyAdmin-4.9.1-all-languages myadmin
phpMyAdminの設定
編集するファイルのある所まで移動する。
cd /etc/httpd/conf.d/
バックアップ。操作ミスがないという自信のある方はスルーで。
cp phpMyAdmin.conf phpMyAdmin.conf.old
エディタを起動させる。
vim phpMyAdmin.conf
以下を表示させる。
Alias /phpMyAdmin /usr/share/phpMyAdmin
Alias /phpmyadmin /usr/share/phpMyAdmin

<Directory /usr/share/phpMyAdmin/>
   AddDefaultCharset UTF-8

   Require local
</Directory>
以下のように書き換える。
Alias /phpMyAdmin /usr/share/phpMyAdmin
Alias /phpmyadmin /usr/share/phpMyAdmin

<Directory /usr/share/phpMyAdmin/>
   AddDefaultCharset UTF-8

  #Require local
   Require all granted
  #もとからあったRequire local の前に#をつけてコメントアウトして新たにRequire all grantedを書き加える
</Directory>
httpdを再起動させる。
systemctl restart httpd
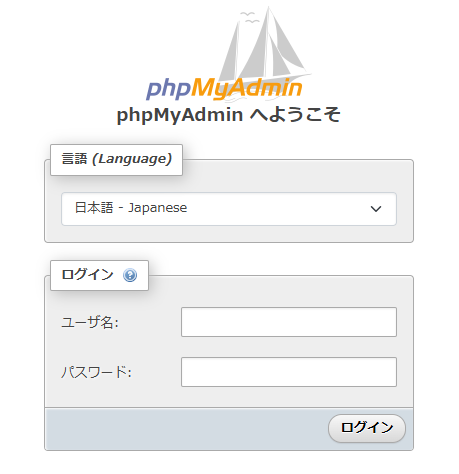
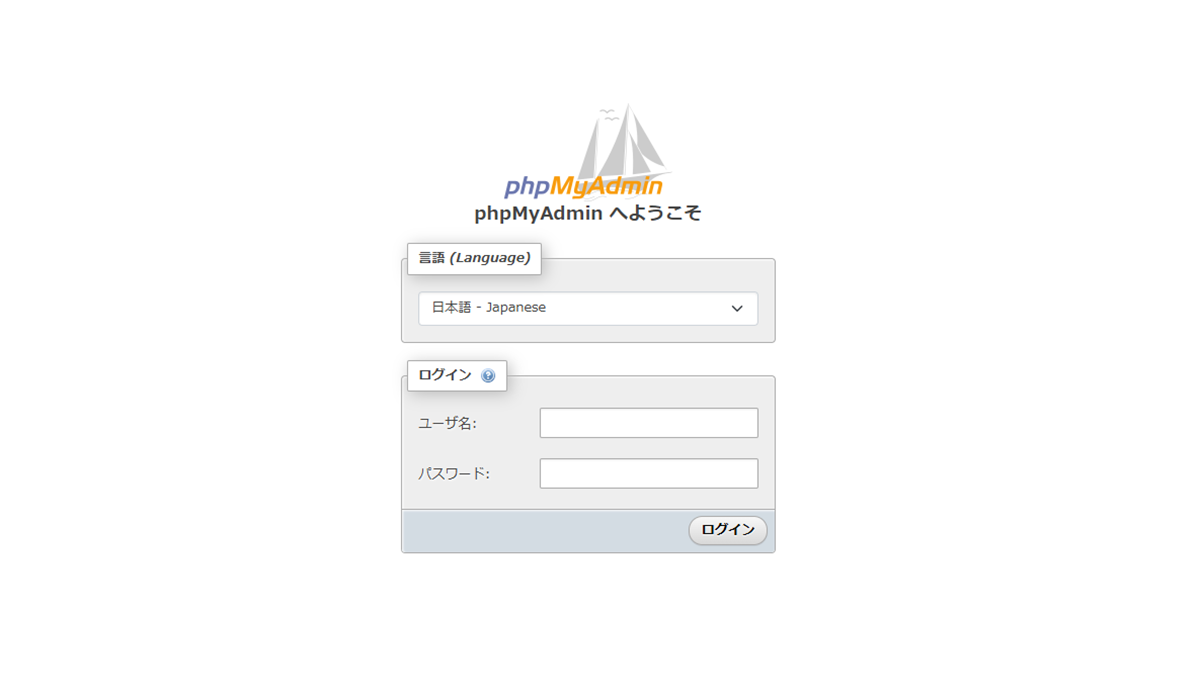
この後https://xxx.xxx.xxx.xxx/phpmyadminへブラウザで入って以下のように表示されるかを確認し、rootでログインできるかを確認する(パスワードはMariaDBのものを入力する)。
phpmyadminのURLの変更
上記のphpmyadminだと推測されやすいのでエイリアス設定を変更する。
再度phpMyAdmin.confファイルへ入っていき次のような箇所、
Alias /phpMyAdmin /usr/share/phpMyAdmin
Alias /phpmyadmin /usr/share/phpMyAdmin
をコメントアウトしてphpMyAdminのあとに推測されにくいテキストxxxxx(←は適当なアルファベットの文字列)を入力して保存する。
以下の要領で編集する。
cd /etc/httpd/conf.d/
vim phpMyAdmin.conf
#Alias /phpMyAdmin /usr/share/phpMyAdmin
#Alias /phpmyadmin /usr/share/phpMyAdmin
Alias /phpMyAdminxxxxx /usr/share/phpMyAdmin
httpアクセスの停止
httpでのアクセスを停止する。
httpdのconf.dファイルへ移動。
cd /etc/httpd/conf.d/
vim phpMyAdmin.conf
以下のように編集する。
AddDefaultCharset UTF-8
SSLRequireSSL#←ここを追記する
#Require local
Require all granted
httpdを再起動させる。
systemctl restart httpd
httpd.confファイルの編集
vim /etc/httpd/conf/httpd.conf
以下のように追記する。
NameVirtualHost *:80
<VirtualHost *:80>
ServerAdmin root@diff-eq.com
DocumentRoot /var/www/html
ServerName diff-eq.com
</VirtualHost>
SSLの確認とその更新作業
httpd -M
以下を確認する。
 ssl_module (shared)
 systemd_module (shared)
 cgid_module (shared)
 http2_module (shared)
 proxy_http2_module (shared)
ファイアウォールの起動の確認
firewall-cmd --state
runningと出ていれば起動中ということになる。
現在のファイアウォールの設定を確認する。
firewall-cmd --list-all
public (active)
  target: default
  icmp-block-inversion: no
  interfaces: ens3
  sources:
  services: cockpit dhcpv6-client http https ssh
  ports:
  protocols:
  forward: yes
  masquerade: no
  forward-ports:
  source-ports:
  icmp-blocks:
  rich rules:
services: dhcpv6-client http https ssh と出ているのが確認できる。
ファイアウォールの起動終了再起動
起動
systemctl start firewalld
停止
systemctl stop firewalld
再起動
sytemctl restart firewalld
上記以外のポートの許可
pop3の場合
firewall-cmd --permanent --zone=public --add-service=pop3
リロード設定
firewall-cmd --reload
設定状態の確認
firewall-cmd --list-all
以下のようにpop3が追加されているのを確認する。
public (active)
  target: default
  icmp-block-inversion: no
  interfaces: ens3
  sources:
  services: cockpit dhcpv6-client http https pop3 ssh
  ports:
  protocols:
  forward: yes
  masquerade: no
  forward-ports:
  source-ports:
  icmp-blocks:
  rich rules:
diff-eqマイグレーション4へ続きます。

Title Text
Lorem ipsum dolor sit amet, consectetur adipiscing elit, sed do eiusmod tempor incididunt ut labore et dolore magna aliqua.
Title Text
Lorem ipsum dolor sit amet, consectetur adipiscing elit, sed do eiusmod tempor incididunt ut labore et dolore magna aliqua.
Title Text
Lorem ipsum dolor sit amet, consectetur adipiscing elit, sed do eiusmod tempor incididunt ut labore et dolore magna aliqua.
Title Text
Lorem ipsum dolor sit amet, consectetur adipiscing elit, sed do eiusmod tempor incididunt ut labore et dolore magna aliqua.
-
diff-eq.comスケールアップマイグレーション4
微分方程式いろいろ(https://diff-eq.com)のスケールアップした際の手順のログの第4回目になり…
-
diff-eq.comスケールアップマイグレーション3
微分方程式いろいろ(https://diff-eq.com)のスケールアップした際の手順のログの第3回目になり…
-
連成振動の解②━LaTeXコード置き場
微分方程式いろいろコンテンツ“連成振動の解②(3重ばねの振動)”にて使われたLaTeXコード置き場になります。…
-
diff-eq.comスケールアップマイグレーション2
微分方程式いろいろのOSの脆弱性、およびスケールアップに伴うマイグレーションの備忘録、ログになります。
-
diff-eq.comスケールアップマイグレーション1
微分方程式いろいろのOSの脆弱性、およびスケールアップに伴うマイグレーションの備忘録、ログになります。
-
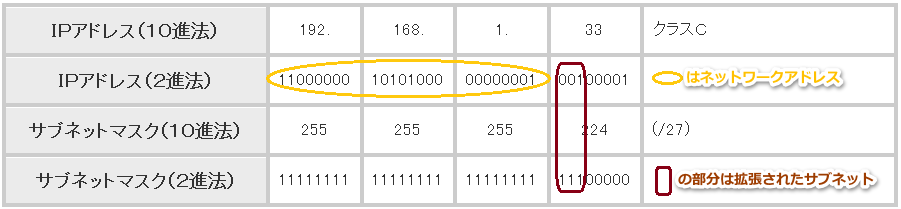
サブネットマスクの計算
サブネットマスクとは、IPアドレスのネットワークアドレスとホストアドレスを識別するための数値で、このサブネット…
-
diff-eq.comスケールアップマイグレーション4
続きを読む
-
diff-eq.comスケールアップマイグレーション3
-
連成振動の解②━LaTeXコード置き場
続きを読む
-
diff-eq.comスケールアップマイグレーション2
-

diff-eq.comスケールアップマイグレーション1
-
サブネットマスクの計算
続きを読む
-
-
diff-eq.comスケールアップマイグレーション3
カテゴリー : diff-eq.comスケールアップマイグレーション3微分方程式いろいろ(https://diff-eq.com)のスケールアップした際の手順のログの第3回目になり…
-
連成振動の解②━LaTeXコード置き場
カテゴリー : 連成振動の解②LaTeXコード微分方程式いろいろコンテンツ“連成振動の解②(3重ばねの振動)”にて使われたLaTeXコード置き場になります。…
-
diff-eq.comスケールアップマイグレーション2
カテゴリー : diff-eq.comスケールアップマイグレーション2微分方程式いろいろのOSの脆弱性、およびスケールアップに伴うマイグレーションの備忘録、ログになります。
-
diff-eq.comスケールアップマイグレーション1
カテゴリー : diff-eq.comスケールアップマイグレーション1微分方程式いろいろのOSの脆弱性、およびスケールアップに伴うマイグレーションの備忘録、ログになります。
-
-
WordPressカテゴリ作成と配置方法
カテゴリー : WordPressカテゴリ作成と配置方法このエントリーではWordPressにてデフォルトで作成されるcategoryのプラグインによる削除と新規で作…
-

CentOS Stream9 2024インストール – 1
カテゴリー : CentOS Stream9 2024インストール – 12024年CentOSの最新版Stream9のさくらサーバでの実装手順になります。途中Puttyが動かなくなる…
-
-